|
"You may have heard the world is made up of atoms and molecules, but it's really made up of stories. When you sit with an individual that's been here,
you can give quantitative data a qualitative overlay."
- William Turner, English divine and reformer, physician and natural historian
Please ask your staff and coworkers to sign up for our GovDelivery notifications. This will ensure they receive the latest updates about the ESIT DMS system as well as our monthly Known Issues Document.
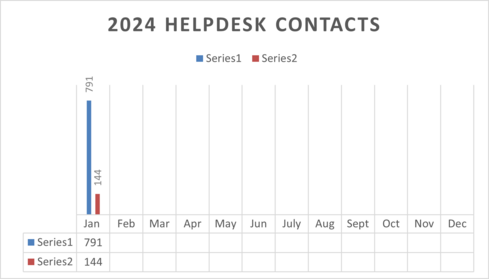
In the month of January 2024, ESIT Help Desk staff processed:
- 144 data fixes,
- 438 administrative changes,
- 352 requests to give school districts access to IFSPs.
2024 Help Desk Data Fixes
If your program is implementing changes and you can anticipate that administrative changes in child records will be required, please notify the ESIT Help Desk ahead of time so we can anticipate the influx in requests.
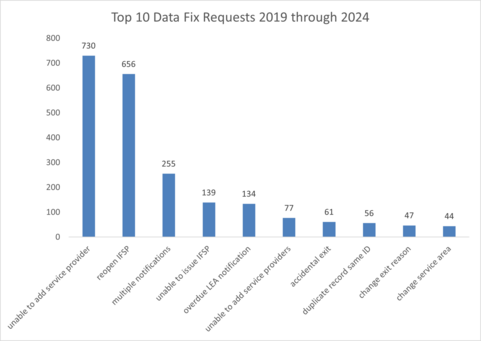
Top 10 Data Fix Requests, 2019 through 2024
The Helpdesk will be processing requests Monday through Thursday for the next month with very limited support on Fridays. Most Friday requests will be assessed in the order received on Mondays. Thank you for your patience with our team during this time.
The compliance period for FY 2023 is from January 1 to March 31. During this time, we will pull reports from Indicator 1, 7 and 8 (compliance indicators) from the DMS and vet them for accurate data entry. Users can be proactive in anticipation of the upcoming compliance period and ensure that all data is entered accurately and in a timely manner. If data fixes are needed, these should be requested as soon as possible to allow time for the work to be completed prior to the beginning of our compliance monitoring work. Users have access to the federal indicator reports in the DMS and can pull the data at any time. For assistance with accessing the reports, please contact the ESIT Helpdesk.
We want to clarify what to do when a record is reactivated after sending out reactivation instructions in the last month’s Known Issues Document.
- If you have reactivated a record and there is not an issued IFSP in the record, you must reach out to the helpdesk to have the referral date reset. This is what creates an updated IFSP timeline.
- If there is an issued IFSP in the record, you will need to issue an annual IFSP to re-establish an IFSP timeline. An annual IFSP is required regardless of the date of the last IFSP in the record as this establishes the updated timeline.
The Helpdesk can support resetting a timeline, but users need to reactivate records on their end. Please follow these Steps:
- Click Create New Referral on the Referrals tab of the Main Dashboard.
- Use the date the child was referred as the initial contact date.
- If you belong to more than one agency, select the applicable one from the Agency list.
- Choose a Referral source of Parent.
- Select a Contact method
- Select a Reason for referral.
- Enter data in the Primary Contact and Child sections.
Important: In the Primary Contact Section, make sure you select something for Relation to Child.
- Click Continue to Match.
-
The Child Match screen now displays a possible duplicate that has been transitioned out. You can tell by the Reactivate icon next to it.
-
Rather than continuing with the current referral and creating a duplicate, simply click the Reactivate icon next to the child’s name.
-
Click OK on the resulting screen. The system closes the window, saves the record, and takes you to the Child Info tab of the Child Dashboard.
-
Close the dashboard tab for that child.
If the child does not have an IFSP on file, please contact the Helpdesk to update the referral date and reset the timeline.
Are you having difficulty having a transfer request approved? The Helpdesk can assist after the following steps have been completed by the requesting agency/FRC:
- It is the responsibility of the requesting agency FRC to communicate with the approving agency/FRC prior to requesting assistance from the helpdesk.
-
Please wait at least 3 business days prior to reaching out to the help desk for assistance with approval. Please provide the helpdesk with the child’s name and DOB if child ID is not available.
Some records are attached to an inactive FRC or intake coordinator in the system; for those transfers, the help desk must approve or decline those requests.
We have noticed a rise in requests for data fixes to reopen IFSPs. We appreciate the hard work you put in to support families in various ways, and we are happy to assist you. However, reviewing your work in print preview format before issuing it can help you avoid the need for a fix. This will ensure that the full IFSP document is accurate before issuing. Once your data is entered and you have the green checkmark, we encourage that you click “print IFSP” for one final read through to check for any potential errors such as missing services or incorrect services listed.
DMS users need to reach out to the help desk to request school district access for children who are potentially eligible for Part B but what does this mean and how can you prepare the record? When you request school district access, the help desk is finalizing the process however it is not immediate unless the FRC or provider(s) has completed the process the tasks on their end.
The following steps must be completed in the record as the school district portal displays students that meet the following requirements:
- The child is at least 2 yr. 3 month old,
- The child has an active IFSP,
- The FRC has selected “potentially eligible for Part B services” on the child’s transition tab.
The student must meet all three requirements. If this is not the case, their information will not be displayed in the school district portal. Please double check what school district is listed in the record to ensure that the notification goes to the correct district.
The SD report runs twice a month at the end of day on the first and the fifteenth.
School district special education contacts will be able to access a child’s Individualized Family Service Plan (IFSP), given the FRC or provider(s) has obtained written, informed parent consent through a Release of Information (ROI).
Before the school district special education contact can access the IFSP, the FRC needs to send an email to the ESIT Help Desk. The email should contain the following information:
“Subject: ChildID 123456 – grant SD access
Body: Please grant Happy Hearts School district access to the IFSP for child ID 123456. ROI is on file.”
The Help Desk will grant access to all special education contacts listed in the respective school district upon receipt of the email.
Writing a good service ticket is not only helpful for the Helpdesk staff, but also for yourself. It can save you time and frustration by getting you the right solution faster. Here are some key points to remember when emailing the help desk:
- Provide relevant details: The more information you can provide about the issue, the easier it will be for the help desk to identify and fix it. For example, include the ChildID when available, or child name/dob when necessary. Also, mention the steps you took before encountering the issue, and the expected and actual outcomes.
- Use screenshots: A picture is worth a thousand words. Sometimes, a screenshot can show the issue more clearly than words. You can use the Snipping Tool or the Print Screen button on your keyboard to capture a screenshot of your screen. Then, attach it to your service ticket using the Attach File option.
- Avoid jargon: Try to use simple and clear language that anyone can understand. Avoid using acronyms or technical terms that might confuse the help desk staff. If you have to use them, make sure to explain what they mean.
We hope these tips will help you write effective service tickets that can get you the best possible response from the help desk. Remember, details matter! The more details you provide, the faster and better the Helpdesk can help you.
For Assistance with ESIT DMS, email dcyf.esithelp@dcyf.wa.gov.
- This is the most efficient way to get in the queue for assistance.
- Send a description of your problem and include the child ID.
- In some cases, it may be helpful to send a screenshot.
- You may send a message directly through ESIT DMS if you do not need to attach screenshots to resolve the issue.
|