|
Good roadway surface drainage should be provided so that water is dispersed off the road frequently and water concentration is minimized. Where soil properties are insufficient to support traffic when wet, restrict use during wet seasons to prevent running and gullying. Outslope roads whenever appropriate and practical and use rolling dip cross drains for surface drainage rather than a system of ditches and culverts that require more maintenance and can easily plug during major storm events. Frequent cross drains, insloping and outsloping, and rolling road grades all need to be in good working order. Failed cross-drain culverts are very common after major storm events.
Properly Size, Install, and Maintain Culverts
Improperly installed, undersized, and plugged pipes are common reasons for culvert failure during storms. Improper alignment or grade relative to channels and ditchlines, excessive woody debris in the channel, excessive channel constriction and headwater elevation, excessively wide inlet areas, and inadequate capacity all contribute to pipe plugging and subsequent failure. Concrete or masonry headwalls greatly improve the resistance of culvert to failure during overtopping. Another common cause of culvert failure is a lack of proper maintenance. Maintaining inlet configurations and removing debris that may plug the pipe are essential for proper function during storms. Stabilize cut and fillslopes. Unstable fillslopes should be removed or treated as necessary to improve stability. Cut and fillslopes should be well covered (stabilized) with vegetation, to minimize surface instability problems as well as minimize surface erosion.
Uncompacted sliver fills and settling or cracking fills are a high priority for stabilization or removal. Fillslopes may also be undercut and over-steepened by a stream or channel. Failing over-steep slopes from road construction where material enters a stream can cause downstream problems, both to the watershed and by promoting plugging of structures.
Use Deep-rooted Vegetation to “Anchor” Soils
Promote slope stability by using deep-rooted vegetation for soil bioengineering and biotechnical treatments. Combine deep-rooted plants with a mixture of shallow-rooted grasses for good ground cover and erosion control on slopes; preferably using native species.
Design High Risk Bridges and Culverts with Armored Overflows
High risk bridges and culvert structures can often be designed with armored overflow areas near the structure in case of overtopping, or they have a controlled “failure” point that is easy to repair and minimizes environmental damage. Alternatively, over-sizing the structure and allowing for extra freeboard on bridges will maximize capacity and minimize risk of plugging. Do not constrict the natural channel. Consider culverts with a span at least that of the bankfull channel width and bridges that span the floodplain.
Eliminate Diversion Potential
All stream crossings, especially culvert crossings, should be designed and constructed (or upgraded) to have NO diversion potential. Stream crossings in steep stream channels that are subject to debris flows should be designed and constructed (or upgraded) to withstand such debris flows without being washed out or resulting in subsequent stream-flow diversion. Structure damage from a plugged culvert may be minimal, but road damage from a stream diverted down the road can be extensive!
West Virginia LTAP's Country Roads & City Streets excerpt from materials prepared by Gordon Keller for the Transportation Research Board’s 11th International Conference on Low-Volume Roads, Pittsburgh, Pennsylvania, July 2015. Storm Damage Risk Reduction Guide for Low-Volume Roads, available at: http://www.fs.fed.us/t-d/pubs/pdfpubs/pdf12771814/pdf12771814dpi100.pdf. Reprinted with permission.
 Victoria Sage & Stephanie Hubble, Michigan LTAP
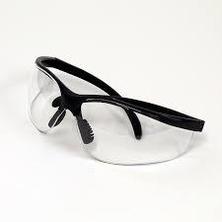
Workplace-related eye injuries affect about 2000 workers every day; a third of these injuries need emergency medical care.(1) Each year, eye injuries cost employers “over $300 million in lost production time, medical and legal expenses, and workers compensation.”(2) With proper protective eyewear, an estimated 90% of workplace-related eye injuries are preventable.(3) Employees don’t wear their personal protective equipment (PPE) primarily due to a lack of employer enforcement but also because the PPE “lack[s…] style/comfort” and “hampers job performance.”(4) PPE styling and its impact on job performance proved important in a subsequent military study that discovered that soldiers were more likely to wear modern-looking, easy-to-use, versatile protective eyewear without extra prompting.(5) PPE is a necessary and important budget item for protecting your employees. While cheap PPE may be a tempting way to economize, buying poorly designed, low-quality PPE might not equate to long-term safety or savings. Purchasing PPE is an investment in protective technology that is engineered to fit well and comfortably in the face of occupational hazards; making wise choices for your PPE investments can lead to long-term savings.
Proper Fit is Part of Safety
Improperly designed PPE doesn’t fit well, isn’t comfortable, and can even be a safety hazard. For example, standard-issue, buy-in-bulk safety glasses may feature slip resistance, wraparound design, and anti-scratch lenses. But, these glasses are often all one piece and come in general sizes so they fail to account for facial structure variances in an increasingly diversified workforce.(3) If safety glasses can’t accommodate narrower faces or nose bridges, they’ll create unprotected gaps diminishing the ability to shield against hazards like debris and dust, glare, and chemical splashes. Likewise, if they can’t adjust to wider faces or nose bridges, they’ll fit too tightly and create soreness. Constantly needing to reposition or remove safety glasses impedes productivity and increases chances of lens scratches. Proper fit or styling ensures employee comfort and protection without hampering their work.
Quality safety glasses come equipped with improved fit/styling features like adjustable silicone nose pads, pivoting temple arms, and distortion-free wraparound designs. Such safety glasses, which range from $10-30 a pair to $200+, are a value-laden technology that safeguard workers through their additional options like prescription lenses, polarized lenses (blocks UV and blue light, which gives additional clarity), tinted lenses (optimizes protection against various light exposures), anti-scratch and anti-fog lenses, and oil-repellent coatings.
Spending a little extra upfront for safety eyewear that has changeable lenses or for higher quality eyewear may save money in the long run. Purchasing more expensive safety eyewear and replacement lenses may yield cost savings over buying lower quality safety eyewear and completely replacing the eyewear.(6) Similarly, purchasing and occasionally replacing higher-quality safety eyewear can result in greater savings than frequently buying and replacing low-quality safety eyewear.(6)
The advantages of good design and quality don’t just apply to safety glasses, but to all PPE. Hard hats, for example, range from nothing but a vinyl headband to terrycloth linings that wick away sweat. Or, high-visibility safety vests can be made from non-breathable polyester mesh or from longer lasting, more comfortable materials like high performance polyester blends.
Quality PPE in a Safety Lifestyle
Because quality PPE is a technology that’s engineered to protect with improved comfort and style for the user, it's an investment in something your employees feel good about wearing. And, if they can select brand name eyewear like Harley Davidsons or Oakleys or Gargoyles, they may even want to wear their PPE. Making quality PPE possible and fostering pride of ownership in employees for their PPE can be done through a co-purchase: determine how much you can allot for each employee’s PPE, give employees the option to cover costs in excess of your allowance when they select their own PPE (eg., using unspent flexible spending account money, out of pocket), and give full ownership of the co-purchased PPE to the employee. PPE that fits well and is versatile for the employee is more likely to be worn and cared for. Ensuring adequate protection and engaging your employees in a safety lifestyle can guarantee the safety of your greatest asset: your workers.(7)
References
- CDC, "Eye Safety", 2013: http://www.cdc.gov/niosh/topics/eye
- US Department of Labor, "Eye and Face Protection": https://www.osha.gov/SLTC/eyefaceprotection/index.html
- David Iannelli: https://ohsonline.com/articles/2014/02/01/improving-safety-eyewear-fit-for-better-protection-and-compliance.aspx?admgarea=ht.PPE
- Survey of safety leaders by Road Construction Market Investigation for ISEA by Strategic Marketing Associates, Inc., Stow, OH (April 2001)
- http://archive.defense.gov/news/newsarticle.aspx?id=43836
- Uvex, “Safety Glasses & Eyewear Pays for Itself” on http://www.uvex.us/inspiringsafety/
- See http://michiganltap.org/bridge/293 Steven Hott's story in Road Commission for Oakland County Coins a PPE Reward Program on page 5
Reprinted with permission from Michigan LTAP. http://michiganltap.org/sites/ltap/files/publications/bridge/Bridge29-3__20160113_FINAL.pdf#overlay-context=bridge/293
|
T2 is seeing some changes in personnel this year.
Bill Kolzow
After 18 years with the T2 Center, Bill Kolzow has decided
to try his hand at full-time retirement.
His last day with us is December 31st. Please join us in thanking Bill for the years of training public works crews in Oregon and wishing him well in his retirement!
Michael Swan
The Safety Circuit Rider position is ending on December 31st,
and Michael will be returning to retirement.
Please join us in thanking Michael for his help on local road safety and
wishing him well on his retirement!
Linda Milligan
Linda has accepted a rotational position in another area of ODOT, so we are bidding her farewell and good-luck as well. Her new role begins November 20, 2017.
Thank you all for your devotion to safety in Oregon!
 T2 Center Director
 On November 13, 2017, the Department of Transportation (DOT) published a final rule that, among other items, expands the Department’s current drug testing panel to include certain semi-synthetic opioids (i.e., hydrocodone, oxycodone, hydromorphone, oxymorphone).
“The opioid crisis is a threat to public safety when it involves safety-sensitive employees involved in the operation of any kind of vehicle or transport,” said Secretary Elaine L. Chao. “The ability to test for a broader range of opioids will advance transportation safety significantly and provide another deterrence to opioid abuse, which will better protect the public and ultimately save lives.”
To learn more about this final rule, visit the web page at https://www.transportation.gov/odapc/Part_40_Final_Rule_Summary_of_Changes or view the rule at https://www.transportation.gov/odapc/frpubs.
|
 Applications accepted through January 31, 2018.
The focus of the Road to Zero Grant Program is to support
the implementation of innovative evidence-based highway safety countermeasures.
- Proposals shall cite the evidence
of effectiveness of the selected countermeasure and describe the
innovative implementation approach.
- Proposed projects that link
behavioral, roadway and/or vehicle elements will be given special
consideration (e.g., incorporating roadway or vehicle strategies to change
safety behaviors).
- Proposed projects shall have
measurable objectives and generalizable results. Projects shall
demonstrate innovative approaches that could be replicated in other
locations.
- There is no limit on the number of
grant proposals an organization can submit.
- Proposals from past awarded Road
to Zero grants are eligible acceptable but they must include new elements
to be considered. For example, an additional innovation to the project is
eligible but a continuation of the past project is not eligible to be
considered for funding.
-
Eligibility
-
Applicants must be a Road to Zero Coalition Member.( There is no charge for membership.)
- Applicant must be a non-profit
organization such as a 501(c)(3), 501(c)(4) or 501(c)(6).
- State, local and municipal
Governments Governors' safety offices, state and local departments of
transportation, universities, law enforcement, public health, etc. are
eligible to apply.
- Proposed programs must operate
within the United States.
Math Basics Series for
Highway Technicians: Introductory Math Concepts
There are 11 modules in
this series. It's recommended that participants start from the beginning
and take all the modules in order; however, they are also welcome to take
just one (or several) modules that are applicable to their training
needs. The topics covered in this series are as follows:
-
Area: This course reviews area, or the amount of
space something takes up on a surface. It also covers the various
equations needed to measure the area of a particular object.
-
Arithmetic: This course reviews
arithmetic, which is addition, subtraction, multiplication, and
division.
-
Decimals: This course reviews
decimals. Everyday numbers are not always whole, especially in
construction, so it's important to understand how to use decimals when
resolving mathematical equations.
-
Fractions: This course reviews
fractions, which are numbers that represent part of the whole.
-
Mean: This course reviews the mean, or average, of
numbers that may be used in a mathematical equation.
-
Order of Operations: This course reviews the
order of operations when solving a mathematical expression.
-
Percentages: This course reviews
percentages, which are regularly used in construction. A percentage
represents the part you have or want compared to the total amount.
-
Ratios: This course reviews ratios, which represent the
relationship between two values.
-
Slope: This course reviews slope. The ground on which
we construct our projects is not always perfectly flat; therefore,
we often need to figure out the steepness or grade of an area of
land.
-
Unit Conversions: This course reviews
unit conversions. Converting the units of various numbers is a
common occurrence in technical work.
-
Volume: This course reviews volume, which is the
quantity of an enclosed three-dimensional space.
 by Bill Kolzow
PLEASE STAY SAFE & COME HOME
Some of you who have attended my classes may remember that I
like to end each class with the above words.
It isn’t something I just do; it’s something I firmly believe in and
want you to join me in that belief.
Someone long ago shared this advice with me, and it stuck with me. I, like many of you, often forgot the advice,
in times when I was rushed, under pressure to get the job done, in a hurry to
get somewhere, maybe after a party, and a thousand other times. Strangely enough, as I aged a little, gained
a family, lost a family member or friend, investigated or was involved in an
accident of some kind, or in other duress situations, the advice popped up
again with a little more meaning. It is
too easy to get complacent about life and work in general, and safety takes a
back seat to many other priorities. But
the above words should be a priority for all of us.
I’ll soon be retiring, and won’t get the wonderful
opportunities I’ve had through my Circuit Rider/Trainer work to stay in touch
with you, particularly through the safety-related classes I’ve taught for
awhile, and through articles such as this.
I just hope that whatever we’ve shared in and out of the classroom,
sticks with all of us, helps us do our jobs and live our lives safer and
longer, and that we make an effort to not only practice the words above, but
pass them and their meaning, their priority, along to others.
PLEASE STAY SAFE & COME HOME
|
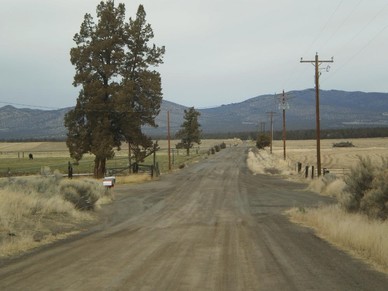 Like fingerprints, each unpaved road is unique. The wear surface may be gravel, crushed rock, or sand, but all have one thing in common: maintenance is required to keep the roadway in good driving condition.
Traffic displaces road surface material onto shoulders and into ditches, forming ruts in the roadway. Washboarding forms at stop signs, hills, and turns, and in areas of acceleration or braking. Storms, runoff, and snowplowing also take their toll on unpaved roadways.
Following are 12 tips that can help motor grader operators to lengthen road maintenance intervals and avoid rework:
- To remove washboarding, cut the corrugations to their full depth, then regrade the area with moist material that will compact. (Corrugations filled with loose, dry materials will reform quickly in areas of high vehicle traffic.) Corrugations are best removed using a scarifier or a serrated cutting edge.
- Articulating the rear frame toward the toe of the moldboard by 2 to 5 degrees helps reduce motor graders’ tendency to bounce, and is extremely effective when cutting out washboards. This places one front tire slightly ahead of the other, allowing one tire to be on top of a corrugation while the other is in the bottom. As the tires roll up and down through the washboard, the front axle will pivot up and down, keeping the front mainframe stable. Don’t use the crab mode when scarifying washboarded areas, as this can bend the scarifier shanks and/or linkage.
- Cut to the depth of major potholes to eliminate them. (Again, filling holes with loose, dry material is ineffective, as traffic quickly displaces the loose material and the holes reform.)
- Typically, begin road maintenance with the moldboard top approximately 2 inches ahead of the cutting edge, and then adjust to the material and conditions. Tip the moldboard forward or back to obtain and maintain the desired cutting-rolling action. Tipping the moldboard forward will increase moldboard throat clearance. Generally, a wider throat opening allows better material flow along the moldboard in a wide variety of soil types. Maintaining a rolling action on the material while working reduces the horsepower required and provides maximum productivity.
- Material buildup in the circle area may increase circle wear. It can also stop material rolling action and cause it to be bulldozed. Bulldozing material requires more horsepower and more traction and reduces motor grader productivity.
- Apply only enough downward pressure to accomplish the task. Excessive downward pressure on a hard, dry surface causes rapid cutting edge wear, requires more horsepower and fuel, and reduces productivity.
- The blade’s tip angle should be positioned with the cutting edge at 90 degrees to the road surface. In this position, downward pressure on the moldboard places less stress on the cutting edge and retaining bolts. The edges also tend to ride over objects, which helps prevent machine damage.
- For maximum machine stability when maintaining roadways, the motor grader’s main frame should be straight with the drawbar and circle-centered under the frame.
- For the widest possible pass on the travel surface, keep the moldboard angle as square to the frame as possible. If material starts to flow around the leading end of the moldboard, or the rolling action dies, increase the blade angle.
- Keep machine travel speed as high as possible for maximum productivity but low enough to prevent machine bounce (generally, 3 to 5 mph).
- Moldboard angles of 10 to 30 degrees are normally used in light, free-flowing material. Higher moldboard angles of 30 to 50 degrees are required when processing wet-sticky material, mixing large windrows, and ditching.
- To cut hard material or for finishing work, tip the moldboard further forward than the start position. When finishing, tip the moldboard top 4 to 5 inches ahead of the cutting edge so the cutting edge is approximately 90 degrees to the cut surface. This moldboard tip position will generally position the drawbar parallel to the finished grade. As always, road conditions and your fleet are factors in your agency’s road maintenance practices.
Article reprinted from Iowa LTAP's adaption of Caterpillar's Governmental Solutions, Spring 2012.
|
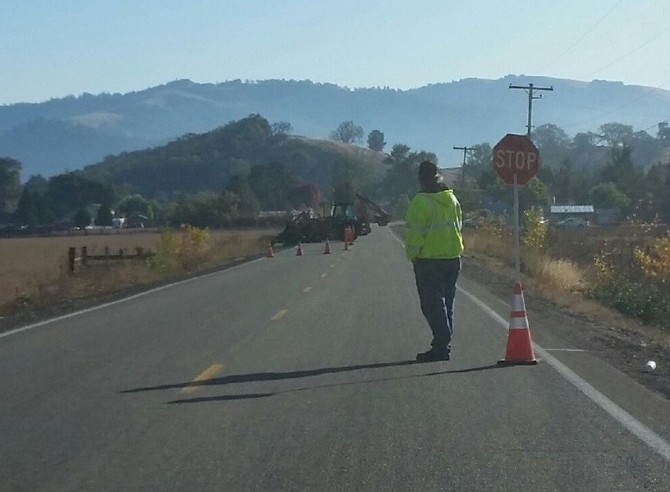 The role and responsibility of a flagger is an extremely
important part of a safe work zone. They
are responsible not only for their own safety, but also the safety of their
team and motoring public. If you are
flagging, never let your guard down while on duty.
This picture shows several safety related issues:
- Never
turn your back on the traffic flow you control
- The safest place to stand is ON THE ROAD
SHOULDER and not in the travel lane
- You should keep the Stop/Slow paddle under your
direct control at all times. The use of
a temporary stop/slow support stand should not be part of the flagging station.
- This flagger appears to be using a stop/slow
paddle on a support pole that is below the flagger’s field of vision. To ensure their safety, the bottom of the
sign must be above the flagger's line of sight to ensure a full view of traffic
movements from all directions.
The following free publications are available from the T2
Center. You may order as many copies as you wish. Available while supplies
last. To request your copies, call us at 503-986-2855 or send an email to T2Center@odot.state.or.us.
 Intersection Safety: A Manual for Local Rural Road Owners
More than 20 percent
of all traffic fatalities in the United States occur at intersections and over
80 percent of intersection-related fatalities in rural areas occur at
unsignalized intersections. This document provides information on effectively
identifying intersection safety issues in local areas, choosing the
countermeasures that address them, and evaluating the benefits of those
treatments.
|
 Road Safety Information Analysis: A Manual for Local Rural Road Owners
Rural areas face a
number of highway safety challenges. Data is the foundation of any roadway
safety improvement program and often this is lacking, especially in local rural
areas. This document was developed to provide data collection and analysis
techniques as well as other processes applicable to the local practitioner to
help improve the safety of local rural roads.
|
 Roadway Departure Safety: A Manual for Local Rural Road Owners
This document
provides information on effectively identifying roadway departure safety issues
in local areas, choosing the countermeasures that address them, and evaluating
the benefits of those treatments. It is geared toward local road managers and
other practitioners with responsibility for operating and maintaining their
roads.
|
by Sue Raynor
When we discuss safety and safety audits we generally
perceive it to be a negative experience, such as a “tax audit.” However an
audit does not always need to be formal and it does not always need to be
negative. An audit can be a positive
experience and it might just save you from injury or death.
The definition of an
audit is: A systematic or methodical review; to examine with intent to verify.
Audits can apply to your home life and to your work. From a safety standpoint there is only one
way to do a job-the safe way. An audit is simply part of the effort to continuously review how we do our job.
Contrary to an IRS or internal audit which evaluates what we
did not record, our job audit should evaluate what we did record. If we take
the time to at least mentally think out the steps that we go through to
perform a task, we can audit it to ensure we are safe. Some questions to ask:
- Do we have the correct PPE for the job? Is it in good condition?
- Do we have the correct traffic control devices?
- Do we know how to operate the tools or equipment
(proper training)?
- Have we performed a Job Hazard Assessment for
the task we are performing?
- Is our vehicle ready for travel?
These are just a few quick questions to ask ourselves when
performing tasks. If we are doing something for the first time or it has been a
long period of time since the task has been completed, we should perform a more
thorough “audit.” These questions not
only should be asked at work, but also at home before starting
projects.
 by Amy L. Terry, Kentucky LTAP
It’s hard to believe that winter is almost upon us. After record snow, ice, and low temperatures last winter, it is important to be prepared for the upcoming cold temperatures. Workers who are exposed to extreme cold or work in cold environments may be at risk of cold stress. Extremely cold or wet weather is a dangerous situation that can cause occupational illness and injuries such as hypothermia and frostbite.
Hypothermia
When exposed to cold temperatures, your body begins to lose heat faster than it can be produced. Prolonged exposure to cold will eventually use up your body’s stored energy, resulting in hypothermia, or abnormally low body temperature. A body temperature that is too low affects the brain, making the victim unable to think clearly or move well. This makes hypothermia particularly dangerous, because the victim may not know it is happening.
Symptoms of hypothermia can vary depending on how long you have been exposed to the cold temperatures. Early symptoms include: shivering, fatigue, loss of coordination and confusion. Late symptoms include: no shivering, blue skin, dilated pupils, slow pulse and breathing, and loss of consciousness.
The following steps should be used to treat a worker suffering from hypothermia:
- Alert the supervisor and request medical assistance.
- Move the victim to a warm room.
- If their clothing is wet, remove it.
- Warm the center of the body first: chest, neck, and head.
- If conscious, warm beverages may help increase the body temperature.
- After the body temperature has increased, keep the victim dry and wrapped in a warm blanket.
Frostbite
Frostbite is an injury to the body that is caused by freezing. Frostbite causes a loss of feeling and color in the affected areas. It most often affects the nose, ears, cheeks, chin, fingers, or toes. Frostbite can permanently damage body tissue. In extremely cold temperatures, the risk of frostbite is increased in workers with reduced blood circulation and among workers who are not dressed properly.
Symptoms of frostbite include: reduced blood flow to hands and feet, numbness, tingling or stinging, bluish or pale skin.
Workers suffering from frostbite should do the following:
- Get into a warm room as soon as possible.
- Unless absolutely necessary, do not walk on frostbitten feet or toes as this can increase the damage.
- Immerse the affected area in warm, not hot, water.
- Warm the affected area using body heat.
- Do not use a heating pad or the heat of a stove or fireplace for warming. Affected areas are numb and can be easily burned.
Employers and workers can both take steps to reduce the risk of cold stress. Employers should provide cold stress training that includes information about prevention, symptoms and treatment. When cold environments or temperatures cannot be avoided, workers should follow these recommendations to protect themselves:
- Wear appropriate clothing. It is best to wear several layers of loose clothing as it provides better insulation.
- Protect the ears, face, hands and feet in cold weather. Boots should be waterproof and insulated. Workers should always wear a hat since it will help to keep your whole body warmer.
- Limit the amount of time outside on extremely cold days and take breaks in a warm location when available.
- Carry extra clothing such as socks, gloves, hats, jackets and blankets and switch them out if something gets wet.
With a little advanced planning and preparation, employers and workers can help prevent cold stress and be prepared, if necessary.
Source: National Institute for Occupational Safety and Health, www.cdc.gov/niosh/topics/coldstress/
©2017
University of Kentucky, Technology Transfer Program (T2)
Reprinted
with permission from T2, Kentucky Transportation Center. http://www.kyt2.com/assets/files/uploads/link_newsletter_Fall_2015.pdf
|
 Clear Roads is a pooled-fund national research consortium focused on rigorous testing of winter maintenance materials, equipment and methods for use by highway maintenance crews.
Since getting under way in 2004, Clear Roads has grown to include 35 member agencies, each contributing $25,000 annually to fund research and technology transfer efforts. Representatives from the participating departments of transportation meet twice a year to discuss and prioritize projects, share effective practices, and review research results.
Primary Activities:
- Evaluating winter maintenance materials, equipment and methods under real-world conditions.
- Developing specifications and recommendations.
- Studying and promoting innovative techniques and technologies that will save agencies money, improve safety and increase efficiency.
- Supporting technology transfer by developing practical field guides and training curriculum to promote the results of research projects.
What Kind of Research?
There are too many to list, but a few are:
To see a full list of research done by Clear Roads, go to: http://clearroads.org/completed-research/.
To see a list of current research, go to http://clearroads.org/research-in-progress/.
For more information about Clear Roads, check them out at http://clearroads.org/.
|