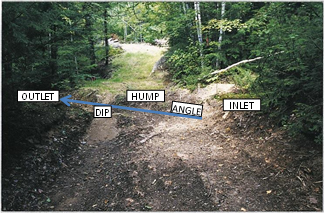
Woodswise Wire Plus - January 30, 2015

Having trouble viewing this email? View it as a Web page. Bookmark and Share

Woodswise Wire Plus

Waterbars

Waterbars are one of the most commonly used BMPs.  Inexpensive and quick to install, a few properly placed waterbars before a big rain or at closeout can mean the difference between a trouble free harvest and the headache (and legal liability) of mud in the brook. As pointed out in previous articles, just because the calendar says “winter” doesn’t mean mud can’t happen!

Though they seem simple, installing an effective water bar takes some thought and practice.  It is better to take the time to get a few good waterbars in the right places than waste diesel plowing up a lot of “mounds of dirt”. It’s worth considering pre-installing waterbars on winter harvest areas before freeze-up. That way they will be ready to go whenever they are needed.

Waterbar Spacing Guidelines

The first question to ask is do I need waterbars?  A trail that has been well brushed or one that has used the natural terrain to break up long continuous slopes may not need waterbars at all.  Trails that have long continuous slopes, steep sections or approaches to stream crossings with exposed soil are all good candidates for waterbars. Once you have determined waterbars are needed, take some time to figure out the best locations. Waterbars need to be located frequently enough to prevent large volumes of water from accumulating in the trail.  Even more important than strictly following the spacing chart is getting waterbars located so they will get water off the trail where it will stay off the trail.  On stream crossing approaches, the last water bar should be located just outside the waterbody filter area.  Inside the filter area soil stabilization techniques, such as brush or seed and mulch should be used instead of waterbars.

Waterbar Diagram

A properly constructed water bar has five parts, an inlet, an outlet, a hump, a dip and proper angle.

Inlet – The inlet of a water bar must extend far enough off the trail to be sure all runoff on the trail is captured.

Outlet – The location of the outlet is the most important part of a waterbar! It must extend far enough off the trail in a location where water will not reenter the trail. It should direct the water into an area of undisturbed forest floor so it can disperse before sediment reaches a waterbody.

Hump – The hump of a waterbar forms a barrier so water cannot continue down the trail, it does not need to be huge, depending on conditions often 6-12” high is sufficient.

Dip – The dip channels water off the trail and out the outlet. Ideally the dip has a slight slope of 2-3% so water will drain but not gather enough speed to erode the bottom of the dip.

Angle – Waterbars should be located at about a 30 degree angle to the trail.  A “mound of dirt” oriented perpendicular to the trail will not drain properly and will form a dam that water will run around or over. 

Installing a good waterbar with a skidder presents some special challenges, for a helpful video check out: https://www.youtube.com/watch?v=U4j_vhC3I6M

For more details about specific practices and principles, check out MFS Information Sheet #8, “Fundamental Best Management Practices for Water Quality Protection During Forest Harvests.” You can also download a .pdf version of the 90+ page MFS booklet called Protecting Maine’s Water Quality.

As always, you can call the Maine Forest Service for more information or assistance at 1 800 367-0223 (in state) or (207) 287-2791, or e-mail forestinfo@maine.gov.