Woods Wise Wire
The Maine Forest Service plans to begin distributing the second edition of its popular publication, The Woods in Your Backyard by late summer 2020. The book was first published in 1999 and was well received by family woodland owners, educators, and the public. To help people enjoy the Maine woods and the outdoors in general, the Maine Forest Service is releasing several activities from the book in electronic format this spring. The second activity to be released, Plant a Hard Mast Species, is a great way to add beauty to your property and improve its value for wildlife. The next activity is scheduled for release in about two weeks. Stay tuned and stay safe.
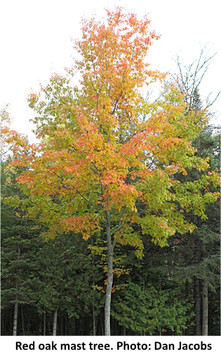
Mast is the botanical name for the nuts, seeds, or fruits of trees and shrubs that are eaten by wildlife. Hard mast includes nuts and seeds such as acorns, hickory nuts, and walnuts. Mast trees can serve as a food source for wildlife while providing you with many other benefits. Planting a mast tree in your yard can provide you with shade on hot summer days and can help beautify your property. Although there are many species that can be planted to provide food for wildlife, planting a native species is the best option for wildlife and for optimal tree growth. For example, northern red oak grows well throughout the state, has red leaves in the fall, and produces nutrient-rich acorns. Shagbark hickory, black walnut, and disease-resistant chestnuts are other good options. Visit your local garden center to check out some native mast-producing species, and don’t forget to have fun planting your tree with family and/or friends.
|
- Select a location. If possible, the planting site should be sunny and not too wet. Assess the site for obstacles by first looking up—avoid planting too close to overhead wires, other trees, or buildings. Your tree will grow. Therefore, select a site at least 3’ from pavement or fencing, 15’ from buildings or other trees, and at least 25’ from overhead electric wires. Check the planting site for underground utilities and contact Dig Safe at 811 (or 888-DIG-SAFE) at least 72 hours before planting.
- Select a tree. Take time during the winter months to look at online nursery catalogs and tree guides to make sure you select the right tree for your location. It is often best to preorder trees through local nurseries in the winter to get the best selection of species. It is also a good idea to speak with the nursery staff about the types of trees best suited to your planting site. Many factors, in addition to the site, can also contribute to the species of tree you select. These factors include the type of wildlife you hope to attract (or not attract!), susceptibility to health problems, and tree features such as flowers. While larger caliper trees may make a more immediate impact on your landscape, smaller 10- to 15-gallon containerized trees are best for this activity. One person can transport a smaller tree without large equipment, and the planting hole will be manageable to dig with hand tools. To get the best results, make sure the tree you select is free of common problems such as crossing and rubbing branches, damage to the trunk, and evidence of insect and disease problems.
|
The purpose of this activity is to plant a mast-producing tree that will benefit wildlife on your property.
30 minutes once the tree is at the planting site.
1. Move your tree to the planting location, and remember trees are not 2x4’s. Lift or carry your tree by its root packaging, most likely a planting pot, rather than by its trunk or branches. Once at the planting location, remove all trunk and branch packaging including trunk wrap, twine around the branches, and tags. Prune any broken or dead branches while you are able to easily reach them.
2. When you are ready to begin digging the planting hole, remove the root packaging. This is necessary to assess the root ball and take some measurements. These measurements will help you to dig a properly-sized planting hole. The depth of the planting hole should be the same as the height of the root ball. The width of the planting hole should be two to three times the width of the root ball measured at the widest point. The process of digging an appropriately sized planting hole is described well in the USDA Forest Service’s Tree Owner’s Manual (see https://www.fs.usda.gov/naspf/publications/tree-owners-manual-national-edition).
3. Gently place your tree in the center of the planting hole and check that it is straight from two different angles. Backfill the hole with the original soil if possible. If there is not enough, mix the native soil half and half with organic garden topsoil and compost. Fill the planting hole to the top of the root ball and break up any soil clods. Then water the root ball and the entire backfilled area.
4. Once the soil is settled at the correct planting depth, add a two- to four-inch layer of mulch over the entire planting area. More mulch is not better, because it can prevent the roots from getting oxygen. In addition, piling mulch on the trunk is an invitation for pests and can encourage decay.
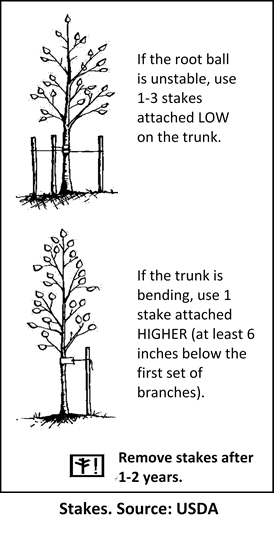
5. If your tree is unstable or in a very windy area, you can use one to three stakes and canvas straps attached loosely on the trunk to anchor it (see the USDA’s diagram on this page). Be sure to remove the stakes and straps in one to two years.
6. Watering your tree can be the most important thing you do to ensure its survival. For the first three years, regular weekly watering throughout the growing season is recommended. Apply 1.5 gallons of water for every inch of trunk diameter. Less water is needed during periods of rainy weather.
7. Installing a trunk guard made of plastic tubing or wire mesh will keep small mammals from chewing the bark during the winter. Make sure the guard is not in contact with the bark, and that you remove it in the spring. Finally, review the USDA Forest Service’s Tree Owner’s Manual for guidance on tree care after planting.
|
|

