|
FALL 2015
IN THIS ISSUE
1. How do I enroll my organization in the
Minnesota Immunization Information Connection (MIIC) system?
Submit a MIIC
Data Use Agreement by email to Alissa
Walden or Dee Her or fax it to
612.466.9770.
2. How do I request a MIIC user account?
If your organization is already
participating in MIIC, submit the following information to ImmuLink staff Alissa, Dee or the Help Desk:
- Organization name or code
- First name
- Last name
- Phone number
- E-mail address (cannot match another user’s
email)
3. Is there a specific internet browser I need
to use when using MIIC?
Yes, MIIC is most compatible with Internet
Explorer (IE) version 10.0 and below. MIIC is unfortunately not compatible with other
browsers such as Chrome or Firefox. If your IE version is higher than 10.0, you
can easily change your compatibility view to make MIIC compatible with your IE browser
by following these steps: http://www.health.state.mn.us/divs/idepc/immunize/registry/hp/traincompatview.html
4. What do I do if I am getting the following
message when attempting to log in?
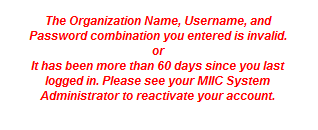 First, check if you are using the appropriate
case, as MIIC login is case sensitive. If it has been more than
60 days since you last logged in, contact your organization’s MIIC
Administrator or ImmuLink staff (Alissa or Dee) to get your account
reactivated. Provide the following information when contacting us via email or
phone:
- Organization name or code
- First name
- Last name
- Username
- Phone number
- Email address
5. When and why does my MIIC account become
de-activated?
If you have not logged into MIIC for 60 days,
your account de-activates and can only be reactivated by contacting your
organization’s MIIC Administrator or ImmuLink staff (Alissa or Dee).
In order
to maintain your login and password activation, you will have to log in and out
of MIIC at least once every 60 days. If you do not use MIIC often, make a note
each month on your calendar to log in and out of MIIC; this way your account
will remain active.
6. What do I do if I forget my password?
Contact your organization’s MIIC Administrator
or ImmuLink staff (Alissa or Dee) to get your password reset. Provide the
following information when contacting us via email or phone:
- Organization name or code
- First name
- Last name
- Username
7. What do I do if I see an error in an
immunization record?
Contact one of the ImmuLink staff to report
the error and provide the MIIC ID.
8. What do I do if I see duplicate records in
MIIC?
Contact one of the ImmuLink staff to report
duplicate records and we will combine the records. For each record, please
provide the MIIC ID number or the patient’s first name, last name, and date of
birth.
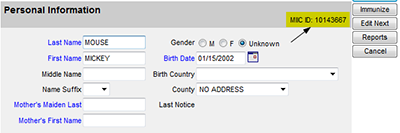
9. Where can I locate the MIIC ID?
The MIIC ID can be found on the top right
corner of the client’s personal information page. You can get to the personal
information page from the immunization record page by clicking on “Edit Client.”
10. What does the check mark under the AKA
column mean?
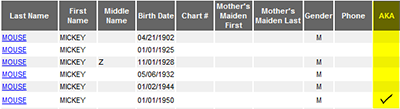 The check mark under the AKA column means that there
is another record associated with the original record. The associated record
may have a different spelling of the first name, middle name, last name, or
date of birth, but both records are linked together. The AKA and the original
record should share the same MIIC ID number.
Back to top
You can add
antigen immunity, medical exemptions, history of diseases, and other comments
to a MIIC record. Here are the steps
required to add a comment to MIIC:
1. Log into MIIC and click on “Manage Immunizations”
in the blue toolbar on the left side of the screen.
2. Once the client’s name is entered and the main
immunization history screen appears, click “Edit Client” -- the gray box
located just below the client’s address.
3. In the middle of the next screen, click on the
gray box entitled “Client Comments.”
4. At the bottom of the “Client Comments” screen
under the “Details for Client Comment” header, you will see “Client Comment” written
in blue. Click the arrow to the right of the “Client Comment” box.
5. A drop down menu of options will be listed in
alphabetical order. Select the appropriate comment.
6. Click on the “Save” button in the upper corner
of the screen.
The history
is now entered. To verify, click “Manage Immunizations” in the blue toolbar on
the left side of the screen and enter the client’s name. Once the client’s screen appears, you should
see their history listed in red just below their address.
Back to top
|